Showing posts with label Prop. Show all posts

Animated Swaying Zombie Prop


Another prop for the 2025 haunt display is now done! My new swaying zombie animatronic is now ready to go out into the yard...


After reviewing last year's display, I knew that I wanted to add some new props with movement this year. My time was short, so I needed something quick and easy. A few years ago, I had built a side-to-side rotating skeleton with lantern sitting on a tombstone with a quick and dependable kit from Spider Hill Prop Works, so I went back to them to see what they had available.

I settled on their Animated Swaying Zombie kit, complete with mounted wiper motor and all PVC pipe sections, and got to work assembling it. I really have to give a big shoutout to Spider Hill, because this kit had literally everything needed to assemble the full figure along with detailed instructions on how to assemble it. The figure went together quickly and easily and was soon ready for finishing. And the fit and finish on the completed kit was top notch.


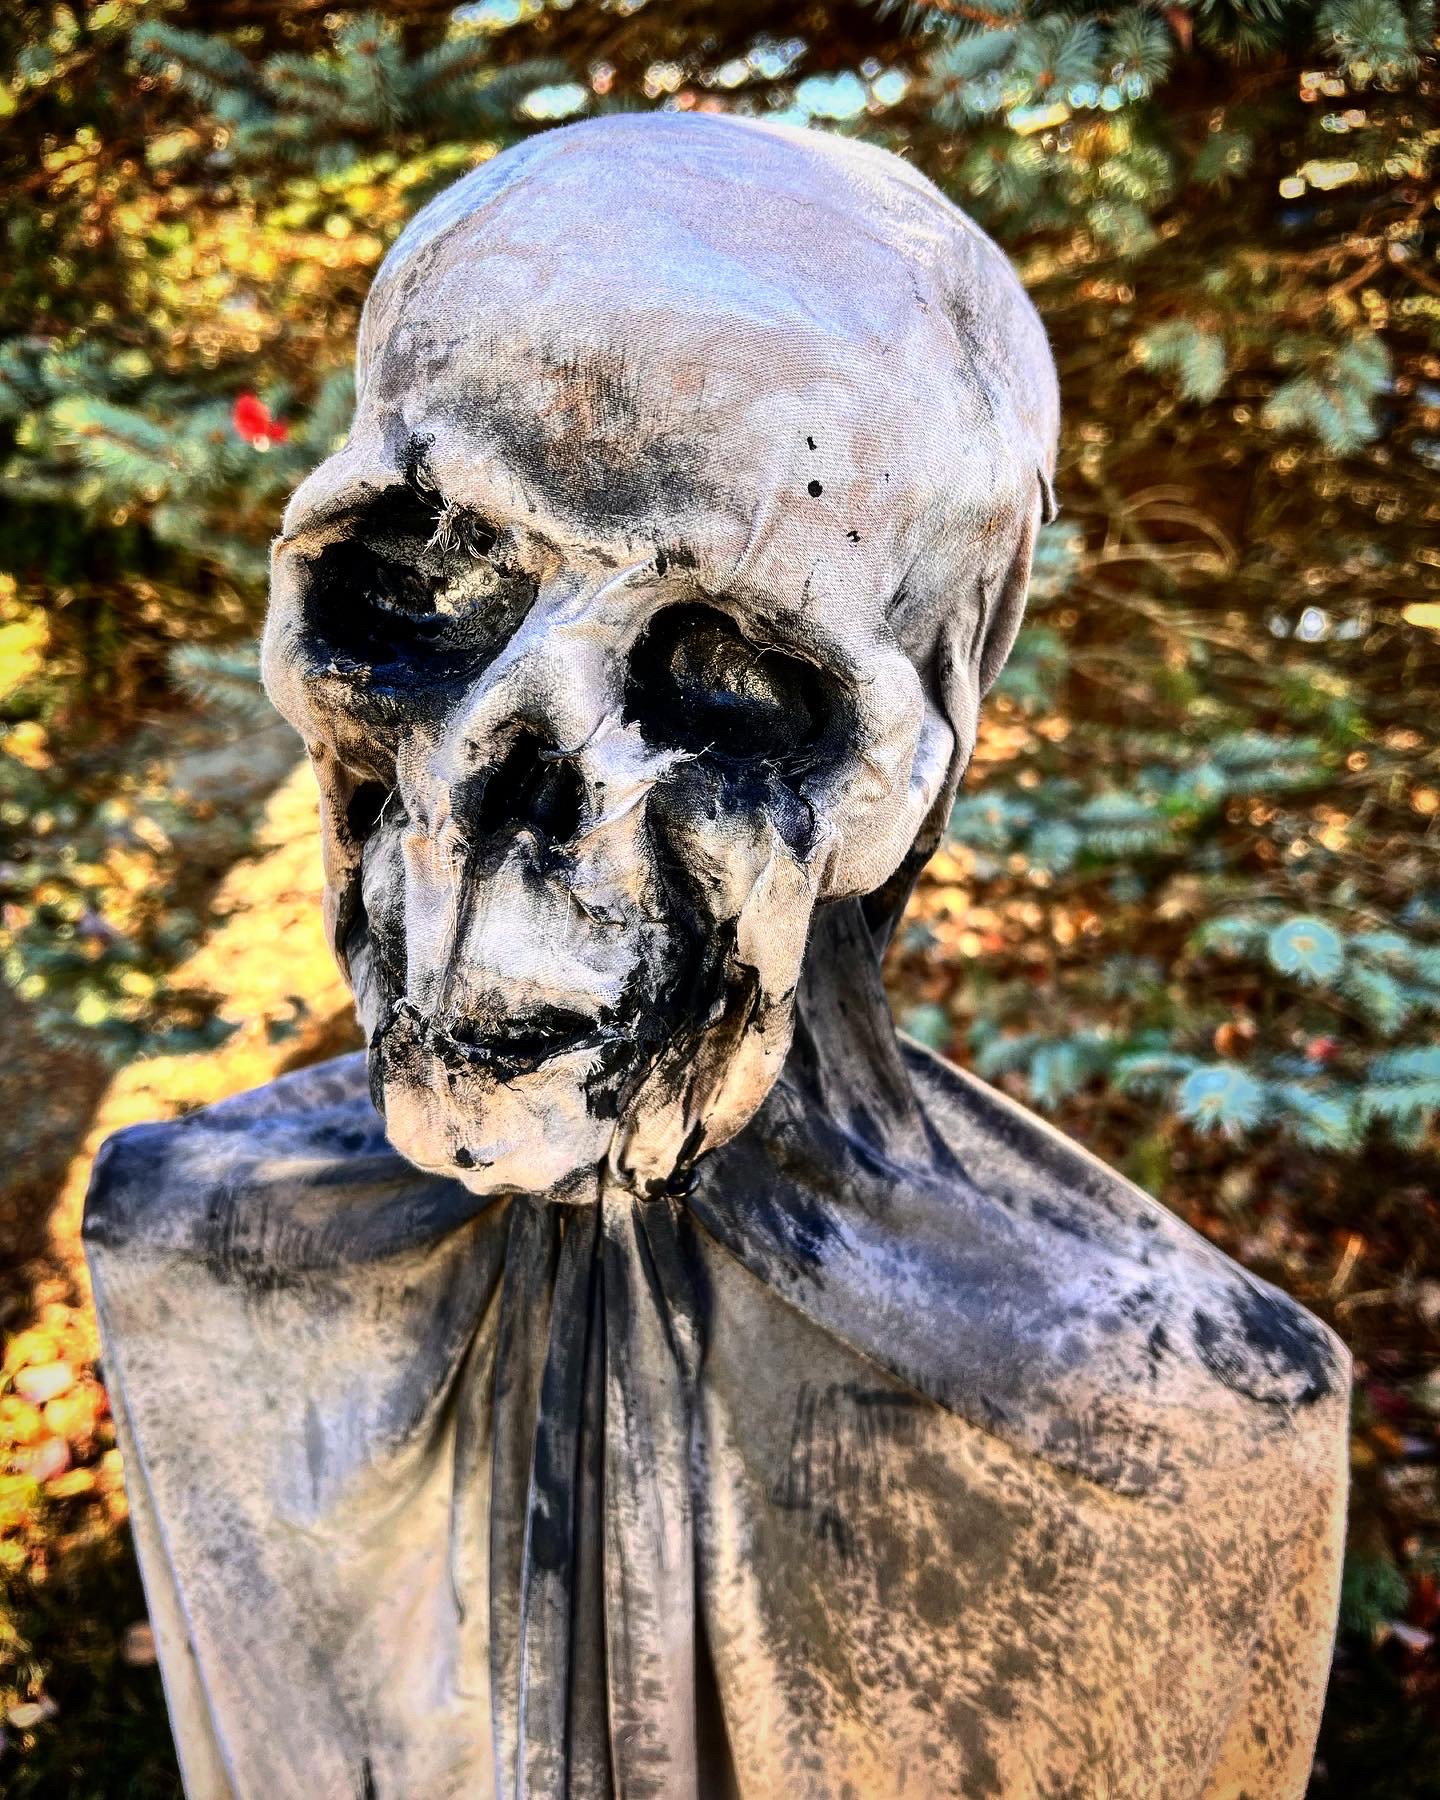
I used a prop head from good friend to the Cemetery, Dave at Closed Casket Studios. The decayed head worked perfectly for this piece, and the best part is that I already had it sitting in my collection! The detailed sculpt really set the entire piece off nicely...

For the clothing, I lucked out and used a full, already-distressed suit that I had used for a zombie costume 10 years ago. It was just sitting in my basement unused, so it worked perfectly for this. And luckily, it fit the dimensions of the kit nicely.


I also ended up grabbing a cheap pair of white plastic zombie hands from eBay to finish the figure. The white plastic ended up matching the color of the prop head and they were pretty close on scale to the rest of the figure. It took a bit of rigging, but they fit snug into the pipe ends of the arms, and they look good when the arms are swaying freely as the figure rotates, almost as if they are reaching out to grab you.

To finish the piece off, I added an MP3 player with external speaker to the inside of the body. I had an old zombie audio track (unfortunately, I can't remember where I got it) that I dug up and used, which ended up working perfectly. A really nasty, gurgling vocal to add the final accent to a really great prop.

I am SUPER happy with the way this one turned out and with how easily it all went together. It is going to look fantastic sitting next to my crypt, right next to the walkway where all of the trick-or-treaters have to pass by to get their candy. I think it will be an intimidating challenge for some to get by as it growls and rotates...

Ashland Hanging Tattered Reaper Prop Upgrade


My second prop of the season is done! I recently picked up an Ashland Hanging Tattered Reaper from Michael's. I wasn't exactly sure what I was going to do with it when I bought it, but I knew that it was a good starting point and that I could make something really cool with it. The only idea I had was to convert it from a flimsy hanging prop into a freestanding piece that would take its place at the front fence of my Cemetery display.

After about two weeks of creating, corpsing, detailing, and fine tuning, I took the finished piece out to a great open field near my house for some epic photos.

My finished piece...


After bringing the original piece home from the store, I got to work disassembling all the parts and building a new t-shaped body frame out of 3/4" PVC piping. I added PVC elbow pieces for the shoulders and neck, and then added extra PVC pieces and elbows to make rigid, bent arms. I next used old packing bubble wrap to bulk out the upper torso. Finally, I hit sections of the main support PVC pipe with a heat gun, bending areas to create a twisted and hunched figure.


I then took the skull and added a screw to the jaw to set it open as if screaming, and did a full, multilayered corpsing with plastic drop cloth and my trusty heat gun. I added a PVC plug into the bottom of the skull, and attached it at an angle to the neck, giving it a contorted, twisted look. And once the head was set, I added a corpsed neck section for added realism and bulk (and to cover the inner PVC frame).


Next, I cut the original, flimsy wire-and-foam arms from the form and stuffed and glued them into the ends of the new PVC arm sections that I had built. Once they were set and dry, I did the same corpsing technique to both arms and hands.


Once the twisted body form was set and fully corpsed, I reattached the original cloak (after a bit of extra tattering, bleach splattering, and a light misting of orange spray paint) to the body. It now had an old, earthy appearance, perfect for the decayed look I was going for. I also ended up leaving the original plastic chain attached, giving it a mist of the orange spray paint to give it an old, rusted look.


After finishing the cloak, the final step was adding a wood stain to the corpsed flesh areas of the body. I concentrated the most detail on the head, adding heavy coats of stain and quickly wiping away the raised areas to create higher contrast around the eyes, nose and mouth.


And that was it! Another new piece ready to be placed into this year's display. A quick and easy upgrade to a store-bought piece that is going to look a thousand times better. I'm SUPER happy with the results and really excited to now start on the next, even bigger prop!


Home Depot Eternal Embrace Tombstone Prop Upgrade


My first prop of the season is done! I recently picked up a 40 in. Grave & Bones Eternal Embrace Tombstone from Home Depot. Another really great sculpt on a big box store-bought piece, and with a little bit of added detail would make a fantastic new statue for my Cemetery display. It would also make a great companion piece to last year's Grim Reaper statue project.

The finished piece, shot at my local cemetery...


I made quick work of detailing this piece, using a similar technique to last year's: start with a wash of black paint for the recessed areas and a light wash of white paint in the highlight areas for added detail and depth, followed by a quick dry brushing of green for recessed areas of moss. I then went in and added drippy black tears from the blackened eyes, streaking down the front of the piece. I wanted to concentrate the most detail into the facial area creating a subtle main focal point. The final step would then be a heavy coating of air compressor-and-webcaster hot glue stick spider webbing to give it a well-aged look...

The original piece, right out of the box. Really not bad, but lacks any detail or depth...

With a black paint wash added to darken the recessed shadow areas.

Now with a white paint wash added to pump up the contrast of the highlight areas...


And then a dry brushed green for a mossy effect in the recessed areas. The moss really gives it an aged, organic look.

The final step of adding black tears down the face from blackened eyes, and then a heavy coating of spider webs to give it a decayed, creepy, old look. And the added detail in the faces creates a great, natural focal point to the piece.


I'm REALLY happy with the way this turned out. I was able to detail this piece in short time and the old, decayed look was achieved with relative ease. The cherry on top being that I was able to get my compressor and webcaster gun working correctly and got much better looking webbing than on last year's statue.

Another great piece ready to go into this year's display and the motivation to jump into my next project on the list. Let's go.


Home Depot Grim Reaper Statue Prop Upgrade


The first prop of the 2024 season is now complete! This year, my schedule is going to be very full (a kid in club travel baseball, anyone?), and I have resigned myself to the fact that I just won't have the time for any major projects.

Luckily the big box stores have really upped their game this year, offering props that I would actually include in my display (snobbish, maybe, but I have always been of the thought that buying a bunch of store-bought props and throwing them in the yard is a disservice to the creativity and dedication to the home haunter culture. But that is a discussion for another time...).

Last week, I decided to peruse the Halloween section at my local Home Depot, and discovered this super cool 42 in. Grim Reaper Statue. A really great piece right from the start, but I felt I could add just a bit of detail to really make it pop. So I grabbed one, brought it home, and immediately went to work.

The original prop, from Home Depot.


The finished prop, from Highbury Cemetery.

I started with a wash of dark purple/black paint in the recessed areas of the statue. I really wanted to add depth and contrast that I felt was missing from the original. I then went in with a dry brushed white paint and touched up the raised areas, furthering the contrast.

I also wanted to make this piece look like it had been sitting in an old cemetery for a long time, so I then went in with a green "moss" paint wash in the recessed areas of the bottom of the statue and around the skeleton's face. I had originally planned on using an old Spore Kit from Brutal Rust to give an added flocked moss texture to the piece, but decided against it after seeing the great results of just the green paint.

Finally, I went in with a watered down black wash and added "streaks" around the eyes, nose and mouth of the skeleton. I wanted to keep the most detail in the focal point of the piece.

And after all of the various paints and washes were complete (and I was quite happy with the results), I wanted to add one final accent to really push it over the top. I had an old Webcaster Glue Gun sitting in my basement, so I decided to fire it up and create a veil of cobwebs to give it one last element of creepiness. I had never actually used a Webcaster Gun before, but I gave it a try. I'm sure with practice the webs will look much better, but I'm still happy with the way they turned out here and they photograph REALLY well!

This thing is going to look great in the Cemetery display this year, and it didn't take much time to give it that "little something extra."

After everything was done, the only thing left to do was take the statue to the local cemetery and get some photos!


Monster Make A Wish at Distortions Unlimited


THIS is what it’s all about! A huge shout out to Ed and Marsha over at Distortions Unlimited for making Jackson's Make-A-Wish Halloween dream come true. Creating an incredible, one-of-a-kind animated prop based on his sketches, the Distortions crew went above and beyond to ensure Jackson will have an absolutely awesome yard haunt this year. Their kindness is just another reason why our haunt community is just so good.

And be sure to subscribe to Jackson's YouTube channel and Instagram page to see his killer display. Haunt on, Jackson!

Enjoy this one!


Sheet Ghost No.3 Prop


My final ghost prop for the year is now checked off the list! These Sheet Ghosts are meant to be quick, cheap, stylized ghosts that add a little bit more organic flow and character to my cemetery display. You can
see the full, quick how-to tutorial on them here.

This final ghost was based on a white bed sheet that I had laying around, and then quickly and sporadically dyed brown. I wanted to have a bold, emoting, high-contrast skull face, while adding slight dark wash accent tints to the overall form to give it a more patchy, "earthen" feel. I purposely left the bottom portion of each ghost with less detail, as the lower section of sheet cloth will be wrapped around tombstones in different ways.

The trinity of non-traditional ghosts are now ready to roam the Cemetery for all eternity. I'm pretty happy with the results on all three of these ghosts. There are going to add a bit of much-needed character to this year's display.


Sheet Ghost No.2 Prop


Another ghost prop is checked off the list for 2022! These Sheet Ghosts are meant to be quick, cheap, stylized ghosts that add a little bit more organic flow and character to my cemetery display. You can see the full, quick how-to tutorial here.

This ghost was based on a white bed sheet that I had laying around. I wanted to have a bold, emoting, high-contrast face, while adding slight brown and orange accent tints to the overall form to give it a more "earthen" feel. 

Another non-traditional ghost is now ready to roam the Cemetery for all eternity. I'm pretty happy with the results on this one, with new ideas for number three already bouncing around in my head. Time to get back to work!


Sheet Ghost No.1 Prop


Here's a quick and easy prop that I threw together in about a week, and will stand out nicely among the tombstones in the Cemetery...


I decided that I needed to add a few figures to my Cemetery display this year, and the first idea that came to mind was a group of sheet ghosts. But not the standard, white sheets with two eyes variety. I wanted to make them much darker and creepier...

I had the old sheet for this prop sitting in a bin, as it was used as a backdrop for an old prop years ago. It had already been dyed a patchy grey black color, perfect for this ghost. So with this sheet as the focal point, I went to work...

I ended up using a styrofoam skull head, as I wanted the sheet to form around the skull features on the face.

I also wanted to keep this light and cheap, so I simply used a 1-1/2" PVC pipe for the main body shaft and the shoulders, connected with a 4-way PVC junction.

I then drilled into the bottom of the skull with a 1-1/2" hole saw bit, and then Gorilla Glued the neck portion of the PVC pipe into the bottom of the skull, finishing it with a full coat of flat black latex paint that I had down in the basement. I ended up drilling the hole slightly off-center, as to give the head a slight cock to the right...


I then assembled the main body shaft to the connector section, attaching shoulder sections to both sides. To give the upper part of the body a bit of form, I simply wrapped the shoulder sections with a bit of bubble wrap that I had laying around...


I ended up spray mounting the sheet around the skull head, as I wanted to make sure it adhered tightly to the skull features of the face.


I then finished the prop off with detail work to the sheet. I cut small eyes and a slit for the mouth, adding various washes of watered-down black paint, streaking and dripping across the entire head.

I ended up using fabric glue and a few concealed safety pins to ensure a tight bunching of the sheet around the neck portion, accentuating the folds with black paint.

I simply gave the rest of the body a slight wash of watered-down paint. Nothing too detailed, as I wanted to keep the focus on the head.

This one came together REALLY quickly and easily, and I'm REALLY happy with the end product. I think this ghost is going to look super creepy with some colored lighting to accentuate the horrific contrast of the face as it sits behind one of my tombstones in the display.

I have a few more sheets and one more foam skull, so I'm going to throw another one together this weekend. A family of new ghosts will bring some much-needed life to my cemetery this Halloween.


Anita Cat Memorial Tombstone Prop


I just put the wraps on a special new tombstone going into this year's display. Anita Cat was a friend of a friend who unfortunately passed away earlier this year. She was a fan of the Cemetery, so I thought I'd give her a little memorial there when I heard the news...


Many years ago, Anita let me do her zombie makeup for a costume party that she was going to. I can't remember if she won Best Costume, but I had a ton of fun doing it. Rest in peace, Anita...


Let me show you how I created this stone...

I started by creating the size and shape of the stone along with the epitaph in Adobe Illustrator. I then tiled the printouts together at 100% size. I used a repositionable glue stick on the back of the paper and adhered it to a scrap piece of 2" blue foam that I had. One I had it in place, I trimmed the curved top portion of the stone with a small handheld jigsaw. I then started carving out the black areas of the epitaph with my Dremel tool. I use the guide attachment while carving to keep the depth consistent. It also helps control the tool for more accurate carving...


Once I had the epitaph fully carved, I peeled the remaining paper from the front of the stone, giving it a quick rinse with the hose to remove any paper pieces or remaining glue areas. I then took a piece of sand paper and sanded all of the edges, adding chips and divots to mimic and old, weathered stone. I also gently sanded the entire face of the stone, adding slight eroded streak areas to the cross and some of the letters. Once I had given the stone a full "weathering" with the sand paper, I was ready for paint.


I painted this stone quickly using only three colors. I always start with the darkest color and work my way up to the lightest. I used a very dark grey for my base color, making sure to get into every letter, flourish and crack. 

Once the stone was completely coated with the dark grey, I did a full dry brush coat with a light grey. This color formed the actual base color of the stone, leaving the dark grey in the recessed areas like letters, cracks and chips.

After a thorough brushing of the light grey, I went in with an olive green and sparsely dry-brushed areas of moss and mold. I concentrated on corner areas, especially at the base, and anywhere that water might run down during rain.


For the final step, I needed to add the holes for mounting into the yard display. I always drill 2 3/8" holes into the bottom of the tombstone. I insert a length of 3/8" PEX pipe into each hole, and when it's ready to go into the display, I stick 2 pieces of 5/16" dowel rod into the ground, then slip the PEX pipe holes over them. I may eventually go larger on the pipe and dowel rods, but this setup has worked well for me so far.


I knocked this tombstone out pretty quick, and was happy with the result. On Halloween night, it will get set up in the Cemetery display with the other memorial stones, and we'll be sure to lift a pumpkin beer toast in their honor.