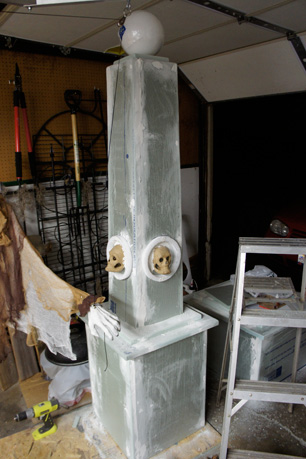
Time to mark another project off the to-do list for this year! I just finished the new centerpiece for the cemetery, the Highbury Obelisk. The namesake of the cemetery now has a worthy marker for his final resting place.
With some wood, a sheet of 1" thick foam insulation and a vague idea of how to assemble it, I went to work in the garage. I'll show you how I built it.
Materials list:
- 4' x 8' foam insulation sheet (1" thick)
- 8" foam sphere
- scrap 2" x 4"
- scrap plywood (cheap particle board used)
- 10 inch length of 1/2" PVC pipe
- 1/2" drill bit
- box of 2" screws
- tub of spackle
- fine grit sandpaper
- white ceiling paint, along with satin black and green latex paint
- 4 small paper mache skulls
I started with a rough sketch and a few measurements. As I went along, I made a lot of new measurements, adjusted details and even more scribbles...
I needed to build it in 3 separate pieces so that it could be stored easily. I started with the tall top piece, cutting the angled sides from the foam insulation board that I picked up from Lowe's. A 4' x 8' board costs about $15. I cut each panel 4' tall (the height of the foam panels), then adhered each edge with Gorilla Glue, then reinforced each with 3 screws. I also added a square at the top, middle and bottom for reinforcement. Each panel was 10" wide at the bottom and 8" at the top, so that it would taper correctly.
I then built a quick framework for the middle section, using the plywood for the top and bottom and the 2" x 4" for the corners.
I adjusted the angles and squareness of the framework after this photo was taken, just before I attached the foam panels. I then built the bottom section in the same manner.
It looks really wobbly in this photo, but fine adjustments were made before the foam panels were attached on both. At this point, I screwed and glued the foam panels on the middle section. I added some rails on the top for decoration. I also left an open area on the top so that the tall section could fit down inside. It slid down into the open area perfectly.
I then screwed and glued the foam panels to the bottom piece, adding the same 2 layers of top rail decoration pieces. The opening at the top is set to the dimensions of the middle section, so that the middle section will also slide right into place onto the top of the bottom piece.
After all of the foam panels were attached on the middle and bottom sections, I sealed all of the seams, gaps and screwholes with spackle. After it had dried, I sanded everything, including all the corners and edges. I wanted to give it a weathered, rounded look.
At this point, I also took some paper mache skulls that I picked up at Pat Catan's, cut the back of the heads off, and mounted them into the top section. I dremeled a recessed area for each so that they sat in the foam panel face. I Gorilla Glued each skull in, then sealed them in with spackle.
I also cut a circle out of foam for each skull as a decorative frame. I attached all with Gorilla Glue and screws.
I was originally going to try and form a pyramid cap at the very top, but I was low on foam and time, so I ended up picking up a 8" foam sphere from JoAnn Fabrics (maybe $7??). I glued a length of 1/2" PVC that I had lying around into the sphere. I also cut a 1/2" hole in the top of the top obelisk section, where the sphere post slid down into.
At this point, the obelisk was ready for painting. I started with a basecoat of matte white ceiling paint. It was a dull finish and it was thick, so it worked perfectly. I have used white ceiling paint as a basecoat on all of my tombstones.
I then added a watered-down coat of black. I streaked it everywhere, giving it a weathered look. I applied it heavier in some areas to give it an old, filthy look.
After the black, I went and gave it a quick splash of watered-down green to give it a natural, mossy coat.
After all of the weathering was finished, I added a Highbury plaque, made from scrap foam. I laid out the stencil template, traced it on the foam, cut it all out, sanded it, painted the lettering and then weathered it with watered-down white paint. The font I used is Abaddon, the same font I used for my main Highbury Cemetery sign.
I was trying to add an epitaph, but I think I'm going to leave it as is for this year. I haven't settled on a name yet, and I don't want to rush something on a project that has already taken so long to complete. I was able to add a flourish above each skull head for detail though. It was done by making a stencil that was traced on each side, then filled in with permanent marker. And with that, the obelisk was complete...
The final obelisk stands at over 7 feet tall and will be placed in the middle of the cemetery. It will be covered with spanish moss and a black crow. I just finished making a few more PVC flicker candles that will be on it, too. As it's planned now, I'm going to put a big blue flood light at the base to illuminate the entire piece.
Only 5 more days until the big night!!
Current weather forecast for Halloween night:
52 degrees with a 30% chance of showers.