Showing posts with label Skull. Show all posts

Walpurgisnacht


Walpurgisnacht. Witches Night.

Tonight, we revel around bonfires and fly to the Brocken mountaintop by broomstick. Engage in unholy pagan ritual as we celebrate the spring equinox...


Closer to home, we revel in this day as the midpoint to the high holiday of All Hallow's Eve.

In honor of this special day, I have brought back an old piece that I originally created back in 2017, with a new refresh. A quick, free form piece to celebrate the countdown to the big night. Halloween. It inches ever so closer...


Lansing Jaycees Haunted House 1984


After yesterday's post on the early Jaycee haunted houses of the 1970s, I discovered yet another classic gem. This one is another guided haunted house walkthrough in Lansing, Michigan from 1984.

And this one is pretty bonkers from start to finish! It looks like an absolute blast, and every actor really goes for it in front of the camera from the standard gorilla (with human hands) in the cage to the guys really hamming it up at the butcher shop. In fact, the only one not going crazy is the ticket guy at the front of the haunt, as he looks to a be a little bit "out of it"... (wink, wink)  :) I would think that working at a haunted house back then would have been a lawless wasteland, but it would have also been incredibly awesome!

Be sure to watch for all of the now classic and collectable masks that some of the actors wear, including the Zagone Fang Face and the Don Post Halloween III Skull and Hagatha Witch.

Another dose of the nostalgic warm fuzzies from 1984. Enjoy!


Lenore Sofia Highbury Tombstone


It's always nice to get that first tombstone of the season under your belt. The first project that opens the floodgates for the rest of the Halloween season projects. I know it's the end of August already, but it's finally go time at Highbury Cemetery! I proudly present my newest tombstone prop and newest member to reside within the rusted gates of Highbury Cemetery, Ms. Lenore Sofia Highbury...


It took a while to get things going for this year, but I'm REALLY happy with the way this one turned out! I decided that I needed a few more females within my cemetery, so Lenore Sofia earned her stone. A strange idea came out of nowhere when I started working on the epitaph, and I decided that this stone's epitaph would all be in French. I thought it would add a little bit of worldly class and sophistication to my display (or maybe it popped into my head when France won this year's World Cup, I can't be sure...). Either way, I thought it was a cool idea and ran with it.


Let me show you how I created it...

As always, I start with the epitaph. I created the full epitaph, complete with names, birth and death dates - all of which in the Highbury household mysteriously die on October 31st - and a few little flourishes and clip art crosses to give it a bit extra.

Translated, the epitaph reads...

In Memory

Lenore Sofia Highbury

Born - January 19, 1809
Died - October 31, 1848

Death by Delirium Tremens (Severe, Fatal Alcohol Withdrawal Delirium)

Rest In Peace


I then come up with an interesting shape, this time based on a piece of scrap 2" thick blue foam that I had laying around in the garage.

I create the final art at 100% size in Adobe Illustrator, then print out the entire thing, tiling the 8.5" x 11" sheets together.


I also had a small paper mache skull that I wanted to use for this stone, similar to the Boris Karloff, Bela Lugosi and Von Bloemhof tombstones that I made it previous years. I also had some LED prop eyes inserted into the stone to illuminate the skull's eyes, although I forgot to photograph it this time around. Just go look at my previous stone links to see how it was done.

Once the epitaph was printed out and tiled, I used repositionable glue sticks to adhere the printout to the tombstone shape that I had cut out. I then used a couple of different bits in my handheld Dremel tool and carefully carved out each letter and cross.


Once all of the letters and crosses were carved, I simply pulled off all of the remaining paper from the epitaph printout, and then gave it a quick AND GENTLE spray from my garden hose to remove any leftover glue.

I then moved to the skull. I used a 4" full paper mache skull that I had picked up from Pat Catan's. I used a coping saw to cut the rear of the skull off, going from top to bottom. I then took the skull face and positioned it on the stone between the two crosses, tracing around the shape. I then engraved the area around the skull shape. This would allow me to embed the skull into the stone.


Once I made an even engraving all the way around and the skull sat flush, I glued it into place with a healthy glob of Gorilla Glue and let it sit overnight. Once the glue dried, I used spackle to fill in the remaining gaps. I really do this to give it a smooth look, as though it was part of stone when it was carved.


I gave the spackle a quick smoothing, and then went to work on the stone itself. I rounded all the edges and corners with a piece of sandpaper to give the stone a weathered look. I also added chips and cracks around the entire shape to give it a worn, aged feel. After everything was sanded, I went to work on the paint.

I have often heard that in painting you should always go from light to dark. But with tombstone paining, I always go from dark to light. I want everything in recessed areas to stay dark. This includes the epitaph obviously, but also the chips and cracks. I start with a complete coat of very dark grey. I never use 100% black, but doing so isn't a deal breaker. Simply my preference for a more authentic look.


After the dark grey dries, I dry brush a thorough coat of medium grey over the entire stone, leaving the recessed area the darker color. This actually serves as the base color for the stone. And once the medium grey dries, I add a few sparse highlight areas with a light grey.


At this point, I want to go with an even-more realistic look, So I add a watered-down drip/spray coating of green for a weathered, mossy and moldy detail. 

After years of photographing old tombstones throughout my area, I quickly noticed that most of the older stones had a cool, natural green coating to them. So I add this as a final paint step to all of my stones now.


Please note that this photo looks very green due to the fluorescent bulbs in my garage. It looks much better in natural light. And when this green coat dries, I drill two small holes through the stone and place the LED prop eyes into it for the skull's eyes. This time, I went with a pair of blue LEDs and I think they look fantastic.

When that was done, I drilled the two small sections of PVC conduit up into the bottom in order to slide them over 2 pieces of dowel rod driven into the ground when I set it up in my display on Halloween night.

**For a more detailed how-to, go check the post on my R.M. Renfield tombstone from a two years ago. It was the first time I used all of the same steps as this stone, and it has become my standard method for quick, easy and detailed tombstone creation.**

So now that the stone was finished, there was only one thing left to do! So I grabbed my camera, some LED tea light candles and a few LED spotlights...


The first tombstone is now in the "finished" pile and it's onto my next project. It's the big project for 2018 and I can't wait to get started. No spoilers, but this one should look REALLY cool as it guides the trick-or-treaters into the newly updated Highbury crypt on Halloween night for their candy!

We're getting dangerously close to October, so the posts are going to start flying in with more frequency, in anticipation for the big night. Like in years past, things will go absolutely bonkers starting on October 1st, going daily straight through to the big night. Lots to talk about and lots to share, so let's make this year the best one yet.


Instagram #100 - Highbury Cemetery Graphic Series No. 7


It's been a while since I last sat down and did some art, so I decided that in honor of my 100th Instagram post (you do follow me on Instagram, don't you??), I would sit down and bang out another Highbury Cemetery Graphic Series collage.

Another fun, spontaneous mixing of Halloween and horror art, featuring some of the prop pieces that I have created for the yard haunt. There's nothing like sitting down and just letting the creativity flow. After about 45 minutes, the latest creation was done...


Off to go post this one to Instagram! And there's enough creativity left in the tank to maybe whip up one more this weekend. Let's see what I come up with next!


100 Days - Highbury Cemetery Graphic Series No. 6


A quick glance at the calendar and I realize that it has caught me by surprise yet again. 

100 days until Halloween. Dammit.

Why not whip up the next image in the Highbury Cemetery Graphic Series, and then get out into the sweltering heat of the late July night and get some new Halloween props done??

Good idea...


Lots of new posts coming, I swear... The project list is written out (again), and now it's time to start crossing some things off. Time to get to it.


The Necromancer's Staff


With barely a day to spare, the latest MHC Masquerade Ball accessory piece has been completed! Just a quick teaser photo of The Necromancer's Staff, a nearly 7-foot-tall walking staff complete with a lit lantern, rusted chime bells, antler fragments and a rotted skull...


This piece was created as a prop accessory for this year's Midwest Haunters Convention Masquerade Ball. I was planning on reusing an old costume, but had wanted to add something with a bit of flash, as the Ball tends to bring out some truly amazing work. The idea of an illuminated staff came to mind, so I ran with it.

The staff itself is a branch that had fallen out of a tree in my neighborhood right after a storm. I found it laying in the street as I was on a bike ride with my son. I liked the shape and size, so I ended up dragging it back home! I sanded it down a bit and then added the arm section which was a piece of old, dried out wood that I had in a kindling pile. I used 2 screws and then glued and wrapped the entire joint, detailing it with burlap strips, jute rope, Spanish moss and strands of Creepy Cloth. 

The lantern was an old IKEA Rotera outdoor lantern that I had used in a previous costume accessory. I simply tied it to the arm piece, again detailing it with Spanish moss and Creepy Cloth. I lit the lantern with a battery-operated pair of LED lights that I had won on an episode of Haunters Hangout earlier in the year, and then covered it with a patch of Spanish moss inside the lantern.

I also got two pieces of deer antler from my aunt and uncle, who are both avid outdoorsmen. They were the perfect size, so I just tied them to either side, letting both pieces dangle freely.

The skull was one of my cast foam skulls that was sitting around unused. I simply drilled down through the top of it and slid the skull down the top of the staff.

And then finally, I knew that I wanted to have some sort of sound when the staff moved, so I ended up getting two packages of "jingle bells" from Michael's. I spray painted each to look rusted, then attached 13 of them throughout the top of the staff. It sounds a bit like Santa, but I'm still happy with the way it sounds and I'm really happy with the way this thing looks!

Come take a look at The Necromancer's Staff (as well as the rest of my costume!) in person this Saturday night at the Midwest Haunters Convention Masquerade Ball in Columbus, Ohio. I'll be jingling all about, so come dance, buy me a drink or simply say hello!


Walpurgisnacht (Highbury Cemetery Graphic Series No. 5)


Walpurgisnacht. Witches Night.

Tonight, we revel around bonfires and fly to the Brocken mountaintop by broomstick. Engage in unholy pagan ritual as we celebrate the spring equinox...


Closer to home, we revel in this day as the midpoint to the high holiday of All Hallow's Eve.

In honor of this special day, I have created another collage design for the Highbury Cemetery Graphic Series. A quick, free form piece to celebrate the countdown to the big night. Halloween. It inches ever so closer...


Highbury Cemetery Graphic Series No. 4


The creativity continues to flow and I was able to whip up another collage image for my continuing Highbury Cemetery Graphic Series. This time around, I threw on my new copy of The Thing soundtrack from Waxwork Records and let the sounds influence the spontaneous image assemblage below.

This series continues to be a simple exercise in free form creativity. It has no specific intent other than to serve as a fun outlet to keep my haunt-related ideas sharp as I head into this year's Halloween planning phase.


Feel free to check out the first three images in the series here, here and here.


Highbury Cemetery Graphic Series No. 3


I had some free time this past weekend and was able to whip up another image in my continuing Highbury Cemetery Graphic Series. It's great to sit down, listen to some haunt-inspiring music and then just let the creativity flow. Grab an image of one of my Halloween props (which so far have all been skull and corpse heads) and then just put together a spontaneous art piece. No specific purpose other than to exercise some creativity...

This time around, I listened to USURPER's killer dark ambient track, Death Dimension, from the release The Disappointment's Room. It had a minimal, dark and very foreboding sense of dread that really influenced this particular piece...


  Be sure to check out the first and second images in the series, as well as read the art's intent here.


Highbury Cemetery Graphic Series No. 2


The creativity keeps flowing and I was able to knock out the second image in the Highbury Cemetery Graphic Series. No specific purpose outside of a way to generate a spontaneous spurt of creativity during the off-season, and a new way to highlight some of the Halloween prop work that I have created over the past couple of years.

Last night, I threw Douglas Pipes' soundtrack to Trick 'r Treat on the turntable, sat down at the computer and finished this:


You can check out the first image (and read about the art's intent) in the Highbury Cemetery Graphic Series here.


Highbury Cemetery Graphic Series No. 1


I had a spurt of creative energy today, so I decided to sit down and make something. I put my Halloween soundtrack on the turntable, sat down at my computer and threw this together:


A fun little Photoshop graphic with no real specific purpose, it's a quick collage of a Highbury Cemetery prop image, coupled with various grunge clip art pieces and the Highbury Cemetery text "logo." I just spontaneously threw the elements together, making a few adjustments here and there, and then called it done. 

This was a great brain exercise for me today, just letting the creativity flow. I have a few more ideas and color palettes floating around in my head and hope to sit down and knock a few more of these fun graphics out soon. This new series will serve as a nice change of pace from the usual process of Halloween prop creation, and should ultimately help in the conceptualization of the larger projects planned for this October.


The Corpsed Skull


So after two painfully long weeks of not being able to work on any Halloween props, I was finally able to get out to the garage tonight and resume my mad scramble towards the big night. First on the list was to finish up a quick corpsing project that I started a few weeks ago.

I ended up grabbing a two-pack of skulls from Home Depot on a supply run a while back, and finally had the chance to finish it up tonight. Nothing too crazy, but it felt great to get it done.

I started with the tried-and-true "plastic drop cloth and a heat gun" corpsing technique from Stiltbeast Studios and finished it off with the "apply-stain-and-wipe" paint effect. I intentionally left more exposed bone on this particular skull for an advanced decomposition look. The only thing to do after it dried was to set it up and get a few photos...


Here's a comparison of the stock skull on the left and my "corpsified" version on the right. This was a quick and easy project that was completed in two nights and looks great with minimal effort. On the first night, I drilled a screw into the jaw (to keep the mouth open) and melted the plastic drop cloth over the entire skull with the heat gun. On the second night, I applied the stain. And that was it. Done. Another corpsed skull ready for my display on Halloween night. And more importantly, the first project out of the way on my condensed list for the haunt season. Time to get cranking on the rest!


Les Masques De La Mort


The latest grouping of burial skulls have been recovered and documented, this time from an unmarked tomb located deep inside a series of caves west of the city of Palmiste on the northern island of Ile De La Tortue in Haiti.


Three skulls, adorned with traditional Haitian Vodou markings were discovered during an expedition into a remote jungle west of the city of Palmiste, Haiti. Upon discovering a series of caves, archaeologists discovered that two of the cave passages had been used for religious ceremony and burial. Along with the recovered skull specimens, various animal bones and religious artifacts were also scattered throughout the cave.


Crane Numero Un 


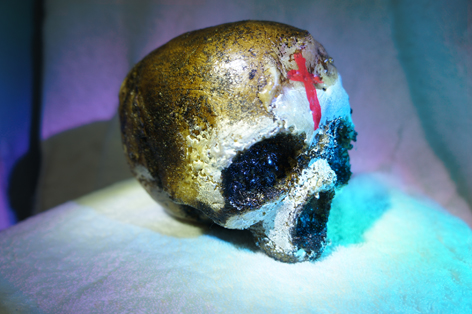
Skull with traditional Haitian Vodou markings. Chalk pigmented white paint embellishment to the face, as well as a cross adorned onto the forehead. Analysis results confirm the cross was NOT a pigmented paint, but was human blood.


Crane Numero Deux


Deformed skull, wrapped in loincloth and bound with jute roping. Right ocular socket appears to be malformed. Loincloth and multiple strands of jute roping have been tied around the skull, as if to cover or hide the deformity.


Crane Numero Trois


This skull specimen is unlike any documented in this region. A separate "skull mask" has been attached to a severely malformed skull in what appears to be a post-mortem edification.

This "skull mask" fragment, although decayed in its present state, has been attached, using a series of crude iron nails and jute roping, to a badly deformed and underdeveloped skull. This underdeveloped skull has massive deformity and no recognizable features in its facial region. Upon genetic testing of the separate fragments, test results showed that both shared nearly identical DNA strands, confirming that these fragments had come from siblings.


--------------------------------------------------


Another set of cast foam skulls are done! I used the same process as The Peruvian Stigmas and The Six Skulls of Osteopetrosis, in that they were cast using Great Stuff expanding foam and a hollow plastic skull mold. Visit my "Six Skulls" page for a full how-to to see how I cast all of these skulls.

On this particular set, I wanted to push it a bit further and created the third skull above. When pulling the foam skulls from the molds, some of the foam is still wet (even after two weeks) and continues to cure and expand as it gets exposed to the air. In this case, the entire face area was still wet, and ended up expanding to a big mess. Along with the wet foam on the skull, I sometimes get some left over liquid foam in the mold itself, and I'll let it set up in the mold, resulting in some cool skull face fragments. As I looked at the "blobby" skull and the face fragment, an interesting idea came to mind: A Death Skull Mask. 

I found some old roofing nails and set them into a saltwater bath for a week to get the heavy rusting effect. I then pre-drilled the holes and carefully glued each nail in. I then took some jute rope that I had lying around and decided to connect each nail with the rope, aging and detaching some as I went to create a weathered effect. 

As always, I started with a base coat of dark wood stain on the skull pieces, quickly wiping away the higher areas for a nice corpsed effect. I then took white ceiling paint and painted the white skull areas, also wiping away some of the higher areas. I then finished with black paint and did a light dry brushing for the dirty areas. After the skulls had dried and I was satisfied with the results, the only thing left to do was to create a fun (and most likely non-factually accurate) backstory!

These skulls, along with the previous two sets, will all be displayed on my skull rack in my Halloween yard haunt.


The Peruvian Stigmas


Stigma:  noun, plural stigmata [stig-muh-tuh, stig-mah-tuh, -mat-uh]

1. A mark of disgrace or infamy; a stain or reproach, as on one's reputation.
 
2. (Medicine/Medical) A mental or physical mark that is characteristic of a defect or disease.


During a 1984 excavation in the remote, outlying areas of the Madre de Dios region of Cusco, Peru, archaeologists discovered a shallow, unmarked tomb located in an area away from the general cohabitation region of what was to be believed the uncontacted Maschco-Piro tribe.
 
This grave area contained two skeletal remains, both of which showed signs of significant cranial abnormality. The two cranial specimens, as documented below, displayed large amounts of calcified growth and structural deformity.
 
Both specimens were also wrapped in loincloths in a way which suggests that both were ostracized from the tribe, most likely due to the deformities displayed in each.


Cranium Specimen Number 1
Cat. 103.01.x hghbry
 
Specimen displays large deposits of calcium nodes, predominantly in the frontal lobe area. Also present is a large structural piercing located above the right occular socket. Piercing appears to be inflicted from a sharp object, approximately one half-inch in diameter. Fabric material has been wrapped around the circumference of the cranium and has been bound vertically with a jute rope. A secondary rope has been wrapped diagonally across the right occular area.


Cranium Specimen Number 2
Cat. 104.02.x hghbry
 
Specimen displays large deposits of calcium nodes, predominantly in the frontal and rear cranial areas. Also present is a large area of smoothing across the top of the cranium. Fabric material has been wrapped around the occular sockets and has been bound with a jute rope.


-------------------------------------------------------
 
 
Here are the first two new foam cast skulls for 2015. I picked up right where I left off last year, when I showed the Six Skulls of Osteopetrosis, and I'm trying to refine the process with each casting. This is still a loose process, but I really like the way each skull comes out of the mold. Some dry, some still wet (which then gets exposed to the air and expands further to create the "Calcium deposits" that I describe above), some complete, some fragmented. I'm going to keep going with this process, as I think it gives each skull its own unique look and gives me the chance to write a quick back story about each one. Be sure to check out my post on the Six Skulls of Osteopetrosis, as I give a full how-to on my skull making process.


The Six Skulls of Osteopetrosis


Osteopetrosis - a hereditary disorder in which old bone cells are not recycled, resulting in increased density or thickness and an alteration in shape of the bone. The bone is thus weaker, due to decreased blood cell production in the marrow.

Osteopetrosis can range from mild to severe with the possibility of being life threatening.

There is no cure.


During an Ohio excavation in Fall of 2014, an unmarked mass grave was discovered in which all of the interred skeletal remains were shown to have severe bone abnormalities and advanced decay. The specimens were delivered to a local university's archeology lab for further study and analysis. Below are the results from that study:


Keyes Archeology Department
October 18, 2014:
An unmarked mass grave was discovered at the Highbury excavation site in Akron, Ohio. Six skulls, all showing varying degrees of deformity and advanced decay, were removed and brought to the Keyes Archeology Laboratory for further analysis. Initial reviews reveal that each specimen showed increased thickness and alteration of the cranium. Three of the skulls also displayed advanced decay.


Photo 1-1: Specimen collection, taken at the Highbury excavation site. 10-18-14
 

Specimens were photographed and documented into the laboratory catalog system. X-ray, 3D scan and advanced bone density testing revealed that all specimens displayed the same symptoms of the hereditary disorder, Osteopetrosis. The following documents the individual specimens with detailed analysis:


Cat. 257.01: Excessive bone density and deformation around the left temporal zone.
Calcified growths also present on right cranial region. 10-18-14


Cat. 257.02: Complete decay of facial and oral region with porous bone fragmentation in nasal area.
Calcified growths also present on rear cranial region. 10-18-14


Cat. 257.03: Advanced decay of rear cranial region with bone deformity and thickness in nasal area.
Textured abrasion on front left cranial region. 10-18-14


Cat. 257.04: Advanced decay of right occular region with bone deformity and thickness in brow and rear cranial area.
Textured abrasion on central and right rear cranial regions. 10-18-14


Cat. 257.05: Advanced bone deformity and thickness throughout occular, nasal and temporal areas.
Textured abrasions throughout rear cranial region. 10-18-14


Cat. 257.06: Complete decay of rear cranial area. Textured abrasions throughout front cranial region.
Minor bone deformity and thickness in nasal region. 10-18-14


Final results and full documentation will be cataloged with the Keyes Archeology Department and all files will be delivered to Blacke Genetics Department Laboratory for further study.

-Dr. Thornton Whateley
 Keyes Archeology Laboratory


------------------------------------------------------


The cast foam skulls above are from a fun little side project that I have been working on throughout the summer and into the fall. It involved a lot of trial and error, adjusting the process as each skull was completed. Here, after quite a few adjustments, is what I did to create them.

I started with a cheap plastic skull. I picked up the black skull below at Pat Catans for $3. Whatever skull you decide to go with, be sure that is is hollow on the inside. I took the skull and cut it into two pieces - front and back:


I then coated the inside of both pieces with Vaseline. It's important to coat everything, including the recessed areas around the face, as this will let the shell release after it has dried. Don't be afraid to really slather it all around:


Once you have both halves coated, it's time to fit the pieces back together with duct tape. Be sure to use plenty of tape, including along the seam as well as some from front to back, as you want to make sure this form will hold together as the foam inside of it expands:


VERY IMPORTANT: when cutting the skull into two halves, be sure to cut a notch opening at the bottom of the skull so that you have a place to fill it with the foam. Also be sure to leave the hole open when taping the form together:


Once the form is together, the next step is to fill it with Great Stuff expanding foam (please wear rubber gloves because getting Great Stuff on your skin just plain sucks - even though I'm not wearing them in the photo below, I did put them on before I started spraying). I usually fill it about 3/4 of the way full, as the foam will continue to expand and fill the rest of the skull:


You'll know it's working when the foam continues to expand, eventually flowing out of the hole. I had to actually wipe some of that foam away, as it continued to expand, flowing down the side of the skull:


And now comes the hard part - waiting. And waiting. And waiting. After various times, I found that TWO WEEKS or longer is needed for all of the foam to expand, settle, dry and harden. Don't forget that not much air is getting into the skull, so it will take a really long time for it to dry. I have also experimented with placing the skull in different positions while drying so that the foam can settle in all the areas. Once the skull is finally dry, remove the tape and gently pull both pieces of the form from your new foam cast skull:


When the skull was finished and dry (you'll have to wipe the excess Vaseline from the foam skull), you'll be ready for detailing. I used wood stain and painted the entire skull, wiping the stain off from the raised areas of the skull immediately. This took another couple of days before it was dry to the touch, but turned out great.


And please be aware that is by no means a fail-safe method. It's a very loose process with many variables. I ended up getting a second skull so that I could rotate between the two each week (filling one up while the other one dries and then pulling the first one while the second one dries). And, even after two weeks of drying, I found that a few of the skulls hadn't fully dried or had settled and left open areas, usually in the rear of the head. You WILL NOT get a perfect skull every time (at least I didn't), so proceed only if you're okay knowing that. These skulls will be placed on a shelf in my yard haunt, so perfection wasn't needed. Enjoy!!