Highbury Cemetery 2015 Video


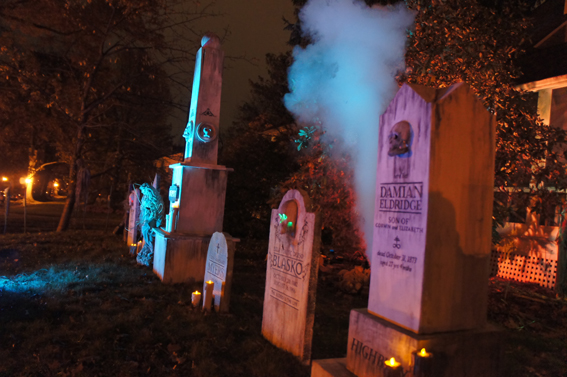
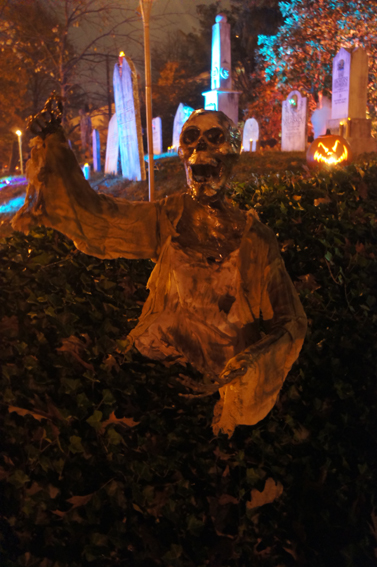
I was able to film a little bit of video right after trick-or-treat ended this year, so I decided to throw this together. Next year, I'm definitely going to bring someone in to shoot throughout the entire night so that I have more than four minutes of total footage to work with...

Enjoy!


Merry Christmas!


Wishing you all a very merry Christmas from Highbury Cemetery!

And yes, I posted this clip last Christmas, but it's so good, I just have to share it again!

But be warned. Santy Claus only brings presents to them thats been good all year. What about you, boy? You been good all year?


Lon Chaney, Jr. - "Monster Holiday"


From YouTube:
Recorded at The Capitol Tower in October of 1964 and issued in November for the Christmas season, 58 year old monster movie legend, Lon Chaney, Jr. does quite a good cover of the original 1962 Bobby 'Boris' Pickett tune. Hollywood's top session players, The 'Wrecking Crew' and background vocals by The Blossoms are featured on the track.


"Nightmare Isn't Over" (Halloween II Rework by Le Matos)


Here's a cool new rework of John Carpenter's iconic 1981 horror theme song. The track is still available for FREE on Le Matos' bandcamp page!


2015 Prop How-To: Highbury Mini Obelisk


I didn't have a chance to show off my latest prop before Halloween, as I finished it just a few days before the big night. But now that the dust has settled, I wanted to take a second and post a proper how-to. This was the only major prop built for the 2015 haunt season, but I'm really happy with the way this one turned out. 

I present the Highbury Mini Obelisk tombstone. Let me show you how I built it...

This prop was created from an actual obelisk located in the Old Tallmadge Cemetery, in Tallmadge, Ohio. I literally went to this cemetery on a lunch break back in August with measuring tape, camera, paper and pen in hand. I quickly took all the measurements and snapped a few reference photos for use on this project. I loved the look of this obelisk and the size was perfect for my yard display.


As I did with the original Highbury Obelisk, I decided to build this in three separate pieces for easy storage. I broke the project out into three sections and went to work on the build, starting at the bottom and working my way up.

I'm going to start with the blueprint plan that I created, detailing all the materials, exact measurements and detailed steps. This originally started as a series of rough sketches, but I wouldn't want anyone trying to decipher those original scrawlings, so I recreated it all in a clean, single page. (I have a full-size, high resolution .pdf available here, if you'd like!)


Base Section:

The base section was a great place to start, as it was the simplest shape, free of any real detail. It proved to be a quick section to build and served as a template for construction of the other pieces. I started with the top and bottom plywood squares, attaching sections of 2" x 2" at each corner, and then in the center of each side for reinforcement. When the frame was all assembled, I added 2" foam sheets to all four sides. Notice that I made the front and back panels the full width, as to eliminate any seams. After the four sides were attached, I added a 1" foam cap, leaving a 16" x 16" opening in the center for the middle section to nestle down into. Once all of the pieces were attached, I plastered over every seam and screw hole. Once dry, I sanded everything, including rounding off all edges and corners for a weathered look.


Middle Section:

The middle section was next, and it followed the same build as the bottom. Slightly different measurements, but the process was identical. On the front panel of this section, I added the "Highbury" family name. I simply printed out the name at 100% (I ended up having to tile it across 2 sheets of paper, but I just lined them up and taped them together), cut out the letters, traced the name onto the foam panel and carved the letters with a Dremel BEFORE attaching it to the frame. I then finished this piece off with the same cap as the bottom section, leaving a 12" x 12" opening for the top piece to nestle down into. Once all of foam pieces were attached, I again plastered over all seams and screw holes, sanding everything down once dry.


 It was at this point that I decided to paint the two finished sections. I coated everything with a thick white ceiling paint. I painted the lettering with a straight black paint, followed by a heavily watered-down wash of black. I kept applying the watery black paint wash until I was happy with the old, stonelike look.


Top Section:

Here is where things got tricky. The frame of this section was built exactly like the previous sections, but the major difficulty lied in the cap. I really had to stop, measure and remeasure to make sure all of the angled pieces were the correct size and would fit together properly. Once the square frame was built, the foam sheet pieces were attached, leaving a 4" peak on each side. I ended up leaving a 1" notch on both sides of the front and back pieces, in order for all 4 peaks to line up correctly (check the photos below to see what I mean).


Before attaching the front panel onto the frame, I had to create the main epitaph. I created a detailed epitaph at 100% scale, printing out and tiling the pages together. I again carefully trimmed out all of the letters and then traced them onto the foam panel. I then took my Dremel and carefully carved out all of the letters. It was a time-consuming part of the project, but paying special attention to detail at this stage will show through once the project is complete.


Once the epitaph was carved, I added one more fine detail. I had a paper mache skull that I had picked up from Pat Catan's (the same one that I had used in a few of my previous tombstones). I cut the back of the skull off from top to bottom, leaving just the face. I traced the outer edge on the top portion of the epitaph, carving a recessed channel for the skull to sit in. I used Gorilla Glue to hold it in place, then a thin layer of plaster to fill all of the gaps around the skull.


After all four sides were attached, I had to tackle the intricate shape of the cap. I ended up using the first two pieces (A. and B. in the blueprint) to span front to back, acting as the main "spine." I quickly realized that I needed to angle the bottom of each piece, so I just ground it down with the sander that I had used for all the previous corners and edges of the previous sections. Don't worry about trying to make it perfect, as those edges won't be seen.


Once the first two pieces were screwed together and then attached to the front and back peak pieces of the main panels, I went to work on the side pieces that would finish the cap. These pieces proved to be difficult to cut correctly with the different angles needed to fit together and then properly with the "spine" section. Again, I had to sand down the inner angles of these pieces, leaving fragile corners. Once I was able to get the measurements correct, I glued and screwed the side pieces together and then attached it perpendicular to the spine section. I then repeated the measurements for the other side, attaching them to the cap.


With all of the pieces attached, I noticed that there were some pretty big gaps. I took the plaster and really applied a lot to fill everything. Once it dried and was sanded down, it looked great! And after the same paint/wash technique as the previous sections, the imperfections were further masked.

I was VERY happy with the final piece. And with barely a day to spare, I set the finished obelisk in the yard to grab some daylight photos.


The new mini obelisk looked great in this year's yard display, sitting to the side of the larger family obelisk. It also sits a bit taller than any of my individual tombstones and breaks up the horizontal height line nicely.


Hopefully the blueprint instruction sheet will prove to be useful if someone wants to try this project. It was a challenge, but it was a ton of fun to create. And if anyone has any questions about the build, don't hesitate to drop me a line. I'm always here to lend a hand!!


Hand Carved Krampus Masks by Christian Eberharter


Stunningly beautiful hand carved and painted, one of a kind Tyrolean Swiss Pine Krampus masks created by Christian Eberharter in Austria. Available from KrampusMasks.com. See more of Eberharter's work at his site


Teufellauf 2015 - Hollabrunn, Austria


What could be greater than watching a town's annual parade of Krampuses in the middle of Europe?

Here's an incredible video from this year's Teufellauf (Devil Run) in Hollabrunn, Austria. More photos here and here.


Thank you to Jehla Web for the video.


Kammarheit - "Dreamhours"


Release The Bats


One ticket to England, please.


From atpfestival:

All Tomorrow's Parties' Halloween extravaganza Release The Bats is back - and it's set to be ATP's most terrifying yet! The Horror Master himself will be headlining the event, which will take place in both London and Manchester.

Next Halloween, John Carpenter will perform - live and in person - a musical retrospective of his horror soundtrack work, his debut studio album Lost Themes, plus brand new compositions. Release The Bats will be held first at The Albert Hall in Manchester on Saturday 29th October 2016, and then at London's The Troxy on Monday 31st October 2016. Both venues will be transformed Halloween style, and attendees are encouraged to dress up for the spooky spectacular.


Christoph De Babalon - "Opium"


So I'm sitting around the Cemetery in a post-Halloween funk of boredom, when I came upon this wonderfully dark, atmospheric track. This is from Christoph De Babalon's 1997 release, "If You're Into It, I'm Out Of It."


"Hallowe'en Spooky Sounds" 7"


I don't want the Halloween season to be over yet, so I'm going to keep it going with a bonus Freebie Fridays offering! It's a classic vintage 45 record that has been burning up my turntable ever since I scored it back in September.


Sounds Records' vintage novelty Halloween 45 from 1962 is your standard faire, with the usual storm, cats, dogs, footsteps, moaning, laughing and screaming sound effects. It's pretty lo-fi, but the thin, recorded-in-studio sound is what makes this release so great! Classic, silly Halloween spook sounds with classic Halloween sleeve art.

The funny thing about this release is that there seems to be two versions, most likely just label variations. One version has the classic spooky sounds listed on side one and "Storm with Rain and Spookie Sounds" on the second side. The version I have has a slightly different list of sound effects on side one and "Same with space between sound effects," on side two. Regardless, it's still a great little record and it will continue to get some spins on the turntable... 

DOWNLOAD "HALLOWE'EN SPOOKY SOUNDS" HERE.


Highbury Cemetery, 2015


Another successful Halloween is in the books, and for the first time in 4 years, I can say we FINALLY had no rain for trick-or-treat!! When the weather cooperates, we get to set up more of our yard haunt display and more kids get to come out and experience the terror!

This was the best show we have put on in years. Although we had a smaller group of volunteers and actors, everything fell into place and everyone had an insanely fun night. And outside of a few minor prop malfunctions, everything ran smoothly and the display was met with a chorus of compliments from everyone who dared to enter... Highbury Cemetery!

As always, a HUGE thank you to the following crew for helping me set up, run and then tear down my display: Sharon, Karen, Laurie, Neighbor Joe, Andrew, Daniel (the guy from up the street who came down and asked if he could help with the haunt), Mrs. Highbury, Nancy and last but not least, Little Christian Highbury. Everything is put up and taken down in one day and without your help, this show could not exist. Everyone on the list went above and beyond to earn their shirts this year!!!

And finally, I can not forget to send a monstrous THANK YOU to every trick-or-treater, parent and curious neighbor who came through the display. We had record attendance this year! You are the reason we do this every year and your screams, laughter and compliments keep us motivated to return with a bigger and better display for 2016!! Happy Halloween, everyone...


Without further ado, I present Highbury Cemetery, 2015:


And after the last trick-or-treater ran fleeing from the Cemetery, we had a new attendance record: 342 victims!! That's almost 100 more than 2014. Thank you, everyone. See you next year...