Showing posts with label lantern. Show all posts

The Necromancer's Staff


With barely a day to spare, the latest MHC Masquerade Ball accessory piece has been completed! Just a quick teaser photo of The Necromancer's Staff, a nearly 7-foot-tall walking staff complete with a lit lantern, rusted chime bells, antler fragments and a rotted skull...


This piece was created as a prop accessory for this year's Midwest Haunters Convention Masquerade Ball. I was planning on reusing an old costume, but had wanted to add something with a bit of flash, as the Ball tends to bring out some truly amazing work. The idea of an illuminated staff came to mind, so I ran with it.

The staff itself is a branch that had fallen out of a tree in my neighborhood right after a storm. I found it laying in the street as I was on a bike ride with my son. I liked the shape and size, so I ended up dragging it back home! I sanded it down a bit and then added the arm section which was a piece of old, dried out wood that I had in a kindling pile. I used 2 screws and then glued and wrapped the entire joint, detailing it with burlap strips, jute rope, Spanish moss and strands of Creepy Cloth. 

The lantern was an old IKEA Rotera outdoor lantern that I had used in a previous costume accessory. I simply tied it to the arm piece, again detailing it with Spanish moss and Creepy Cloth. I lit the lantern with a battery-operated pair of LED lights that I had won on an episode of Haunters Hangout earlier in the year, and then covered it with a patch of Spanish moss inside the lantern.

I also got two pieces of deer antler from my aunt and uncle, who are both avid outdoorsmen. They were the perfect size, so I just tied them to either side, letting both pieces dangle freely.

The skull was one of my cast foam skulls that was sitting around unused. I simply drilled down through the top of it and slid the skull down the top of the staff.

And then finally, I knew that I wanted to have some sort of sound when the staff moved, so I ended up getting two packages of "jingle bells" from Michael's. I spray painted each to look rusted, then attached 13 of them throughout the top of the staff. It sounds a bit like Santa, but I'm still happy with the way it sounds and I'm really happy with the way this thing looks!

Come take a look at The Necromancer's Staff (as well as the rest of my costume!) in person this Saturday night at the Midwest Haunters Convention Masquerade Ball in Columbus, Ohio. I'll be jingling all about, so come dance, buy me a drink or simply say hello!


2012 Props: Zombie Lanterns


Here is a quick costume accessory that I whipped up for our Midwest Haunters Convention masquerade ball costumes. I knew going in that a simple zombie costume just wouldn't cut it, so I took two old IKEA lanterns that were in my basement and created voodoo zombie lanterns.

Here is what I did:


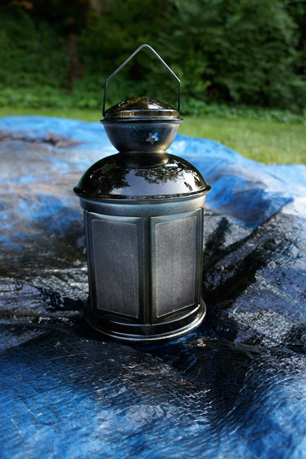
I started with 3 cans of spray paint: Krylon Indoor/Outdoor Satin Black, Valspar Plastic (68123 Satin Chestnut), and Valspar Interior/Exterior Satin (85202 Satin La Fonda Copper).

I started by lightly cleaning the old lanterns.


I taped over all of the glass with masking tape and coated it with the Satin Black base coat.


After the black base coat had dried, I did an uneven, light coat of the Valspar Chestnut, being sure to leave portions of the black base coat visible. When the Chestnut dried, I very lightly spattered the Valspar Copper over everything. This made it look like speckles of rust. I was able to get the paint to spatter by doing quick, light taps on the spray nozzle from a slightly longer distance away than if you were trying to get a full coating.

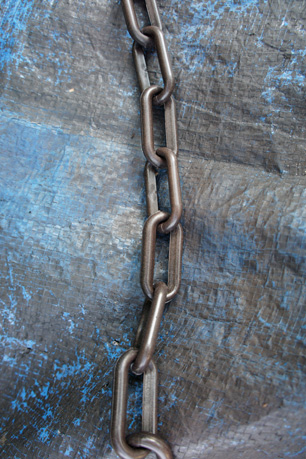
At this point, I repeated the same Chestnut misting and Copper spattering to an 8-foot section of black plastic chain that I had picked up at Lowe's. The 8-foot section would then be cut into two 4-foot sections, one for each lantern. I also coated two quick links in the same paint, as they were used to attach the chain to the lantern handle.


Once all of the paint was dry, I attached the chain with the quick link and removed all of the masking tape from the glass panels on the lantern. I then put an LED flicker tea light in the lantern to see where we were at. Notice the spatters of the Valspar Copper to mimic rust.


I then used some old brown latex paint that was heavily watered down and streaked it on all of the glass panels. This gave a nice, smudged look. When the brown paint had dried, I took some heavily watered down old green latex paint (the same paint that I use for all of my tombstones) and gave a light, overall wash to the rest of the lantern. This gave a really nice patina and completed the weathered look. The final detail was to add some spanish moss, and to snap some atmospheric photos of our new voodoo zombie lanterns. They were a big hit at this year's MHC masquerade ball and they will definitely be a part of our zombie costumes from here on out.


Photo by Laura Dark Photography.


An Easy Lighting Prop


Okay, as promised, here's a REALLY quick and easy idea for a lighting prop. You'll need a mason jar, dark colored paint, a little mulch or dirt, coarse twine and a battery operated LED flicker tealight (which you can get at a dollar store or at any craft store). Start with the mason jar and give it a wash of heavily watered down paint. I used the same brown that I used for the Pratt tombstone. You'll want to make sure that the jar is still semi-transparent so that light can still escape. When it dries, tie the twine around the lip of the jar. Then put a small amount of dirt or mulch in the bottom of the jar and drop in the LED flicker light. In no time at all, you'll have a dirty, old lantern light for your haunt or party. For an eerie lighting effect for this year's haunt, I intend to make about 12 of these, hanging 6 apiece from two large trees in my front yard. Be sure to stagger the lengths of twine and hang the jars at different heights from whatever you'll be attaching them to. A cool effect that takes very little time and money to produce.